DUBLBZ
-
Posts
19 -
Joined
-
Last visited
About DUBLBZ
Recent Profile Visitors

DUBLBZ's Achievements
New Member (1/5)
0
Reputation
-

UD M42 recoil spring
DUBLBZ replied to sschoen's topic in The United Defense Model 42 (UD-M42) Submachine Gun Forum
UD-42 Recoil Spring Pictures.ppt -
UD M42 recoil spring
DUBLBZ replied to sschoen's topic in The United Defense Model 42 (UD-M42) Submachine Gun Forum
• My initial response was to the topic “UD-42 Parts Set Listing”. • Pardon the delay but the item required for response is not stored at my residence. • As for the ejector – the picture in topic “M 42 Parts Image” is probably as close as anything will get. Copying the picture and magnifying it and comparing the scale beside the parts should get you pretty close. The original is not removable from the receiver slot it is installed in. An interference fit pin installed flush with the lower surface in a blind hole can’t be removed without damaging something else. I found the on-line blueprints labeled as not accurate. Going to check them. •The UD-42 recoil spring is a captured telescoping assembly with the spring on the outside. Upon assembly of four (4) pieces, the final piece is staked, so is not capable of disassembly. The end piece looks like it may have been threaded onto the small diameter rod after spring insertion and then punched (two small “center punch” marks on the end) to prevent loosening. • The end with less (smaller ID rod) support for the spring (squiggly end) goes in the bolt. • Total captured free length is 6.00 inches. • Capable compression stroke length is 2.75 inches • OD of both spring retaining ends is .370 inches – fits in the .375 inch dia hole in bolt. • Spring OD is .350 inches with wire dia of .040 inches (which happens to be 1.0mm). Original free length unknown. • Spring force was measured on a digital food scale set under a shop hydraulic press to allow precision spring assembly length adjustment. Spring rate was measured at 5 inches length at 10 pounds. • Captured free length (at 6 inches) force is 6 pounds, starting when bolt is closed. Spring rate is 4 pounds per inch (10lbs – 6lbs over one inch, 6” – 5”). • Picture and drawings follow. • NOTE – What might work, in lieu of a OEM style assembly, is a free spring not larger in diameter than .370” (there are 9mm, .356”, OD springs) with a free internal (to the spring) guide rod made to seat (slight Tee shape) in the spring assembly recess at rear of lower receiver. Guide rod cannot be longer than would fit in bolt spring hole with bolt rear against the lower receiver spring seat area (all the way back). Assembling this may be a bit tricky with a long semi-unsupported spring. This also would allow playing with the spring force (length) to match whatever ammo load you plan to use. I have found 1.0mm WD x 9mm OD x 305mm long (12 inches) compression springs for sale on the internet. -
Just saw this post. I'm willing to provide what you need, but it will take some disassembly to accomplish. As for "Blueprints", what items do you need dimensions/specs for other than recoil spring assembly and ejector? How are you fixed for mags? See my post on UD-42 mag alternatives. The GB item description is no longer available, so I don't know what you got and parts condition. Welcome to the UD-42 club!
-
StrangeRanger, You're right. I had not thought of that. In the situation, every little thing helps. Jim C, The bucket of grenades I have would just get each one rolled down the hallway toward the perp. Takes too long to attach to barrel.
-
From what I see, it looks like 8 identical (same) photos. Boots and pants are in focus with no discernable differences and jammed cartridge is out of focus. That being said, is the stamped marking on your mag release button an 'M' with a UNDERLINE. When M2 was developed, it came with an enhanced retaining configuration to reliably hold 30 rounders vs the original 15 round mags. The underline was added to tell the difference from the outside. As DougStump remarked, the original mag release button does not work well for 30 round mags.
-
Finally finished the bayonet conversion for a weapon light mount. Removed the forward section of the blade with a friction cut-off saw, leaving about 1/10" in front of the guard below the barrel hole. If removed flush, it falls apart. Removed the grips, made a 1/8" aluminum plate, mounted using the two grip screw holes, adapter to mount a flat bottom picatinny rail to its side. Bought a high lumen crimson trace weapon light with a side mount for pic rail. Short line to a momentary switch mounted via velcro on the handguard, and viola, a quickly removeable light for an M1 or 2.

-
Alternate magazines for UD42
DUBLBZ replied to DUBLBZ's topic in The United Defense Model 42 (UD-M42) Submachine Gun Forum
Has anybody else tried this or something similar? With several discussions on the subject of magazines for the UD42, I would have expected it. For interest in just a "Shooter" magazine, there is now a new plastic drum magazine for the Colt style 9MM AR15. It looks long enough to incorporate into the conversion scenario described above. Should look a little strange, but would probably work well. -
Alternate magazines for UD42
DUBLBZ replied to DUBLBZ's topic in The United Defense Model 42 (UD-M42) Submachine Gun Forum
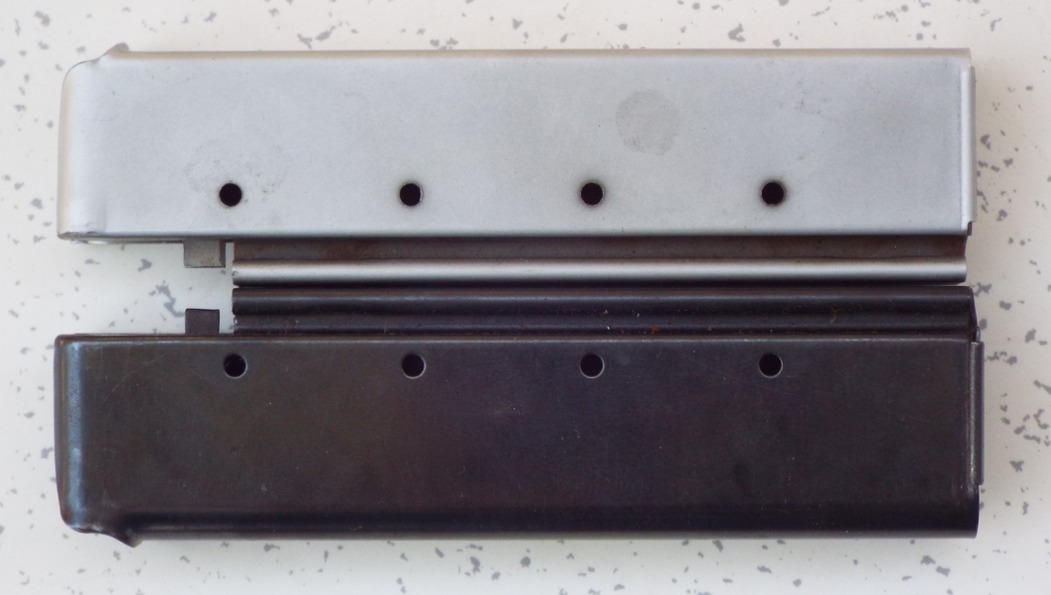
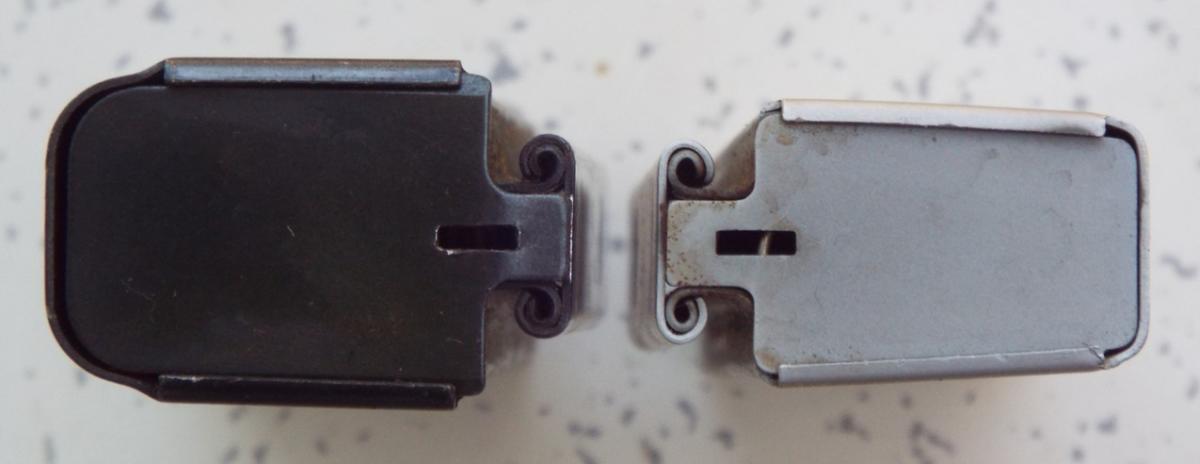
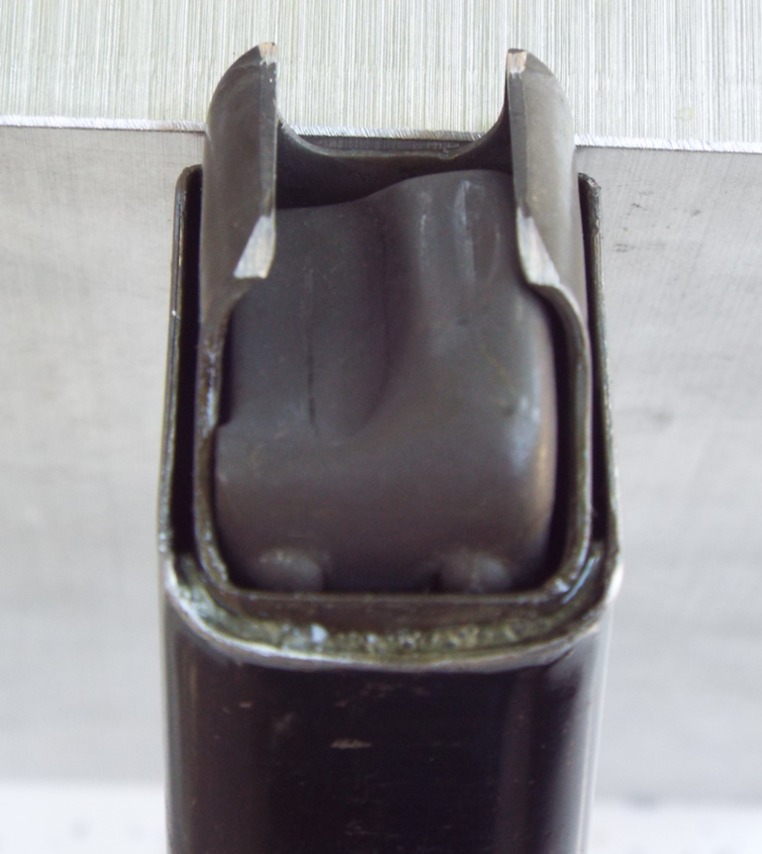
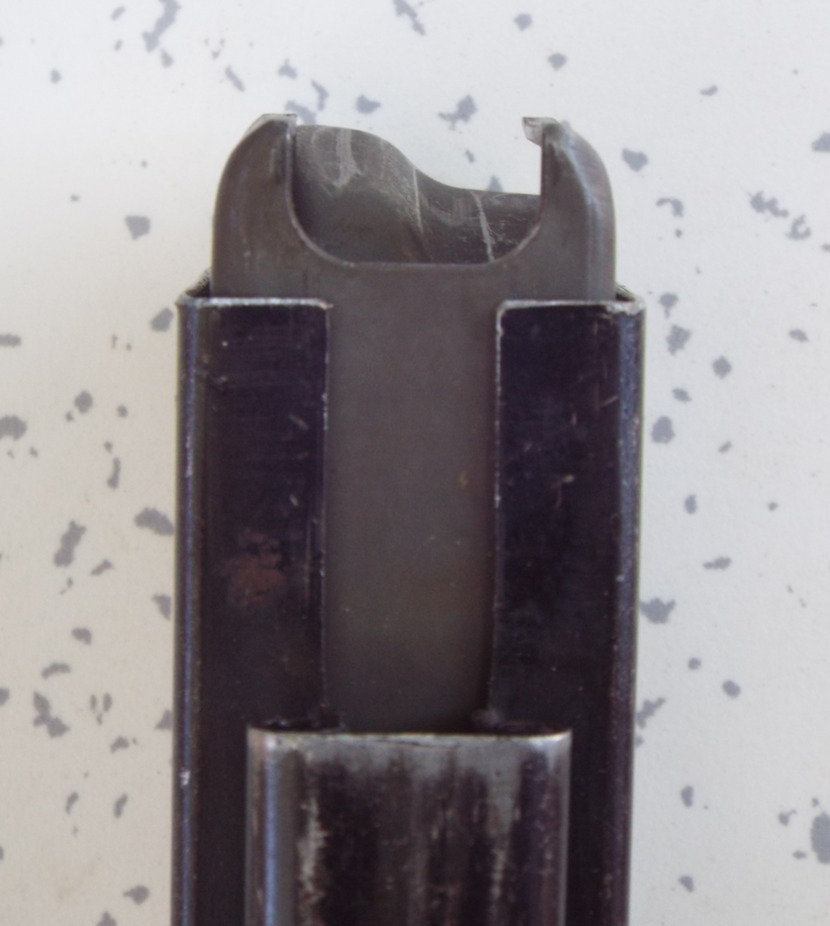
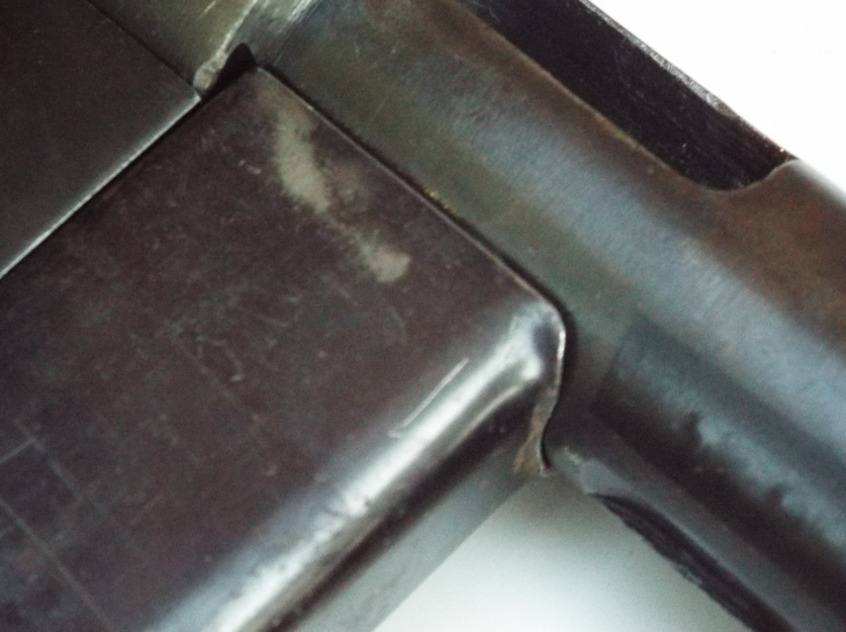
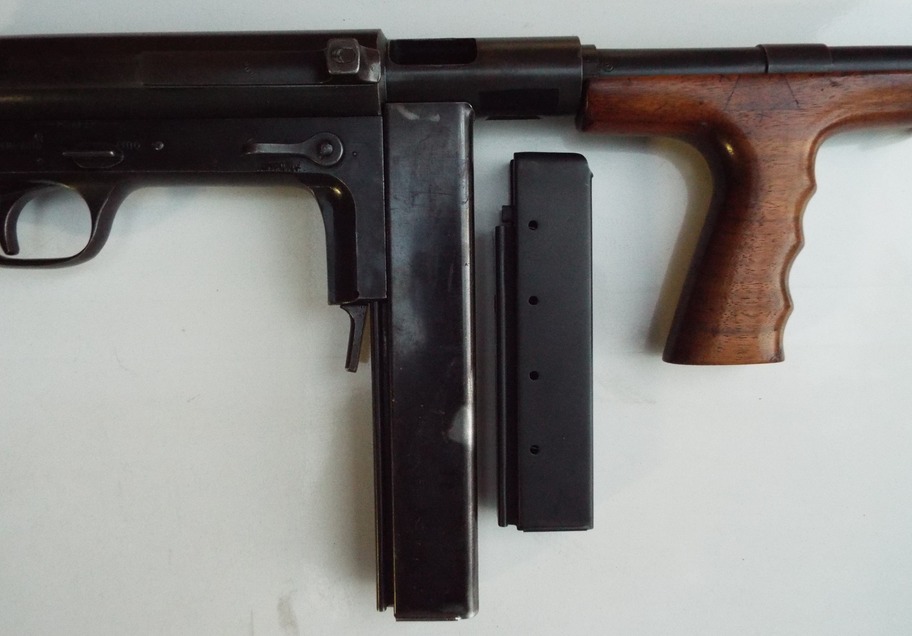
Finished the converted magazine. A few comments on things learned doing this. 1 - Thompson 20 round mags and M42 25 round mags are identical except for the back to front body taper, and very slightly smaller front to back and side to side, accounting for 9mm ammo dimensional differences from 45 ACP. The confusion as to whether the M42 mags hold 20 or 25 may be due to the absolutely identical round-count witness holes as the 20 rounders for Thompson have. Looking at them sideways, one is hard-pressed to tell them apart. My OEM '42 mag is the hard-chrome plated one. 4 holes at 5 rounds each don't really count 25 in most peoples minds. Who knows why the holes didn't get in the proper position, plus one more, when the M42 mags were manufactured. Probably not worth changing the punch press set-up. See pictures. 2 - Don't use a UZI mag. Use a Colt style SMG 9mm mag. Grinding the insertion limit tabs off the sides of the UZI's is way too much work. Hardened thicker steel took a lot of effort to remove with a Dremel. I was surprised at how hard the steel is; but doesn't get bent when dropped. 3 - The top of the feed lips must be ground down very slightly to be absolutely 90 degrees to the length of the mag as shown in attached pic. Not doing so will not allow the bolt to pick up cartridges. The top of the feed lips have to contact the machined ledges on each side, where the ejector is pinned, at the top of the mag well. The back is key. 4 - During my insertion process, which started at the bottom of the Thompson, the fit was tight enough that I used my shop press to start it. Nearing the top it essentially fell in. maybe starting at the top is a better option (by hand). It is almost an exact fit, with line contacts at each front corner radius and the back. No lubrication is necessary; de-greasing is. I used automotive brake cleaner on both mags. Other than the back, there is a little space between each magazine at the front and both sides. it is not much; I didn't "feeler gage" it. If the fit is too loose to stay in position after having it push down during "latch-up" (touching the machined ledge mentioned earlier), slightly bending the top of the two sides of the rear wall inward will create just enough pressure to hold it. ****NOTE - during first attempts, the front edge of the UZI mag just barely contacted the front of the machined mag recess in the receiver, thus pushing it down into the mag about a 10th of an inch, away from contacting the aforementioned ledges. The position of the UZI mag is just a little forward of where the OEM mag is positioned (about .040" or 1mm at the back plus another .010" difference between thickness of mags at the front). A choice needs to be made as to remove a very little at the front edge of the receiver recess (Sacrilege, I know), or remove some at the top front of the UZI mag until it just clears and doesn't get pushed down during latch-up. 5 - Retaining the inner mag in position became the next issue. I decided to use "Gorilla Glue" as it holds well after expanding a little and is not brittle after "Set". This filled the slight spaces between the two mags. Don't use too much as it expands. It also "Runs" because it sets very slowly. Place horizontally, front down after inserting the adhesive into the front and both sides. Inspect it regularly as it sets. Moisture sets it off. It's dry where I am. Took hours. I understand there is a faster setting version. For the original adhesive, putting the mag combo in the freezer for 20 minutes , then setting it outside for condensation to help set the adhesive may speed things up. 6 - Haven't fired with it yet, but ran a couple dummy rounds at the top of the mag from cocked bolt position and it fed them. It looks great while inserted in the SMG. While utilizing the entire length of the Thompson 30 round mag, there may be room for 34 or 35 rounds of 9mm in this.
-
Alternate magazines for UD42
DUBLBZ replied to DUBLBZ's topic in The United Defense Model 42 (UD-M42) Submachine Gun Forum
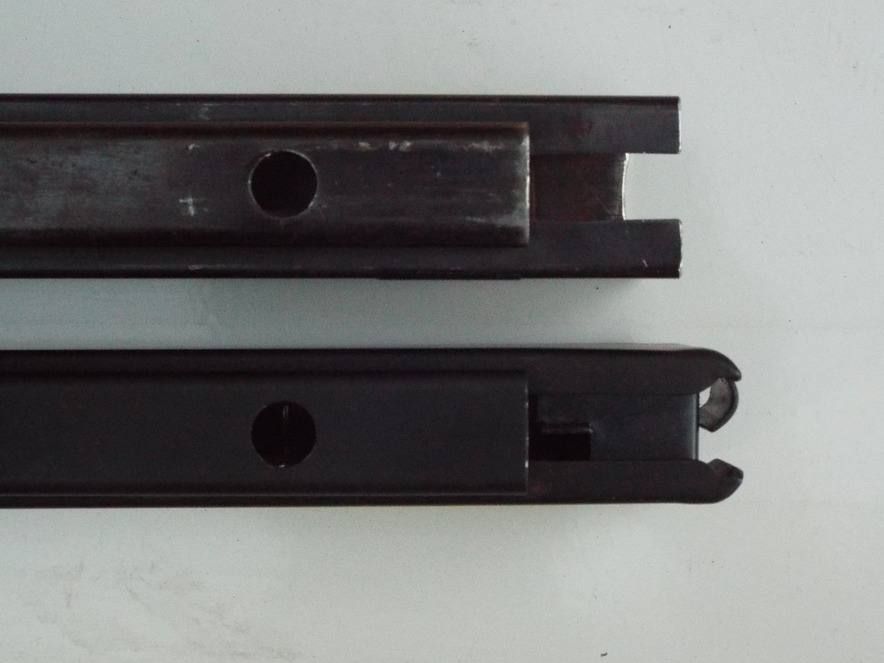
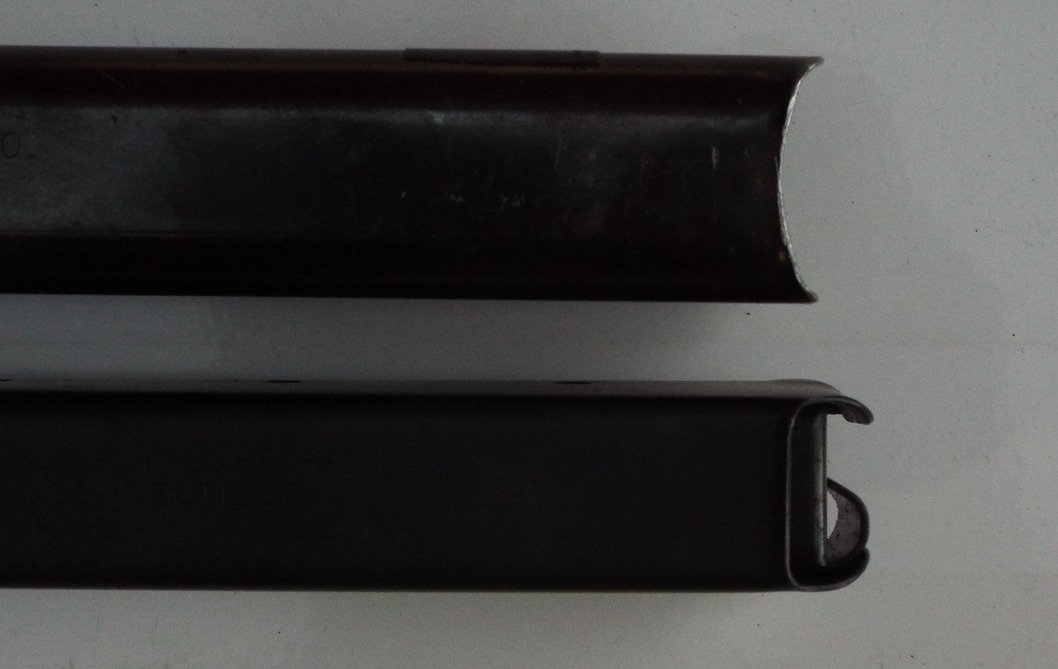
Finally able to get pictures. Making a little, slow, progress on converting a TSMG/UZI combo mag for use in a UD-42. The modification of the top, feed lips end of the TSMG mag is finished to allow lock-up in the '42. Looks and fits good. The lips were ground down on a disc sander by .37 inches (started at 1.20" from top of "T"-spine to top of lips, down to .83" from top of "T"), keeping the surfaces parallel and 90 degrees to the body. The front small lip, which is straight across in the middle, had to be ground down into a radius matching the receiver, since it is outside the machined mag recess. Pictures attached. I have a small concern with the UZI mags. During a little research into 9mm AR-15 configurations, some comments by owners of the Colt SMG magwell conversions which used modified UZI or ASC Colt SMG magazines stated they had had some FTF during the last few rounds. The bodies and followers of both seem to be identical. The bodies have almost no taper from front to back; way less than the '42 OEM mags. A significant tilt to the follower seems to be a compromise to account for the differences in 9mm ammo taper when stacked in a mag body with no or little taper. Sten and Suomi mags have higher body taper like the OEM '42 mags along with a follower that is parallel with the feed lips at the top. UZI and ASC Colt mags have significant tilt between follower and feed lips at the top, maybe contributing to the FTF in the AR-15 configurations. UZI or ASC Colt mag pushed up into a TSMG mag is simpler because of their smooth outer bodies. Sten or Suomi would be preferred if not for all the outer steel welded to the bodies that would have to be removed. Way too much work. I also decided to change the modification at the bottom. Instead of removing about 3/4" off the TSMG mag, allowing no change required to the UZI mag, I am removing the bottom plate retaining sheet metal on the UZI mag and leaving the base plate on the TSMG mag. The spring will be a little longer in both relaxed and compressed modes, or a light spacer could be used if spring tension is too little. It will look so much better. Side note - OEM '42 and TSMG mag has .030" thick body walls and the UZI has 1mm (.040") thick walls. Don't have others to measure. More after UZI mag inserted.
-
I was an IPSC shooter starting in the mid 60's. My eyes today aren't what they were then. Bad time to trust a pistol/eye combo.
-
Well, yes somebody does. FAB Defense Tactical Light/Laser Mount - 1in, AR15, M4 Bayonet Lug (on opticsplanet @ $105). Now just need another light with a remote switch (for mounting to handguard) that has momentary capability, to avoid being too much of a target as Jim C stated correctly. Absolute darkness doesn't help detect a threat. ATF doesn't think too highly of 12 gauges the size of an M1. Wielding a full size12g inside a house, during a gunfight, is not my cup of tea at my age. Did find a useable M4 bayonet for a decent price. Cut off the blade, remove the screw-on grips and make a side mount picatinny rail to replace one or both of them is a possibility. Then could use a pistol light.
-
Alternate magazines for UD42
DUBLBZ replied to DUBLBZ's topic in The United Defense Model 42 (UD-M42) Submachine Gun Forum
I need to correct one word used in the description of my '42's history with me. "Demil" was used, which is appropriate for all recent NFA stuff, but back in those days the term was DEWAT, which stood for deactivated war trophy. A big difference in resulting parts & assemblies. -
Too many different set-ups of bayonet lugs on an M1 Carbine? What? Not a Carbine expert, but would not expect that. Mine has the lug a ways behind the muzzle; room for full bayonet handle between lug and muzzle. Ever seen a weapon light on a MP5; way out in front of muzzle. The lug only has to be a point of retaining it on the rifle, not necessarily located in front of it. There seems to be plenty of room between front of handguard and the muzzle for a weapon light. Barrel clamp-ons are a hoky way of mounting anything to something that recoils. Not for me. The current roaming rioting/looting mob situation has brought this to the forefront of my thought process - home defense at night without the lethality and destructiveness of a quad-50. Short, light, easy to handle and just potent enough with a decent mag capacity. But could use a weapon light.
-
Alternate magazines for UD42
DUBLBZ replied to DUBLBZ's topic in The United Defense Model 42 (UD-M42) Submachine Gun Forum
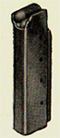
APEX - It started life with me as a demil at Hy Hunter's American Weapons Corp. in Burbank, CA. Check out the 1957 Machine Guns Collectors List #3, available at Cornell Publications. "Special Offer" in it got my attention. I had an original catalog, but lost it along the way. Came with a single mag, as pictured. I picked up another plus a double with an original case for it at gun shows in subsequent years. I love the "junk pile" tables. Never know what you will see for cheap prices. Serial number is in mid 14ks. If the numbering system started at 00001, that would put mine at the very end of production if the 15k total production numbers are accurate. It was and still is in very good condition. No rust or scratches. Evidence of very little shooting. The demil was expertly done with almost no external sign of it being done. Welded between chamber and mag. Went to buy a Thompson, but couldn't resist this when I saw it. Pictures to follow when I get a another USB cord for my camera. -
Does anyone know of either a direct weapon light mount, or a short picatinny rail, using the bayonet lug?