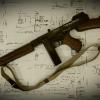
06AngusSG Posted May 8, 2015 Report Share Posted May 8, 2015 (edited) So this will be the chronicle of the remodel of my 1927A1 Kahr Thompson. Just like most any home remodel it started out simple enough. Make the barrel shorter….. yah right. Like that's all that's going to happen… It starts with the barrel. Then the original foregrip looks like crap since Green Mt. makes their barrels to original contour. So now the other furniture won't look right either against a vintage foregrip, so if I'm going to get original Thompson furniture I might as well do a removable buttstock and so I should get on the Machine Gun Boards to find out how to do that and then I was DOOMED…or Lucky…? This board has blown my mind and inspired me to go all out and do whatever possible within my budget to my Thompson. There is so much info on here that it would take years to soak it all up. Before I get into my gun I want to thank the couple of members I've dealt with here first. This may seem cheesy but the people here have helped me turn my "novelty" gun into a sense of pride and accomplishment. Thanks to: Dan Block(for great info, advice and EZ-Pull springs, ReconBOB (foregrip mount), Keith (magazines) and Chris (Kerr M1917) It was a pleasure to deal with all of you. Here is the final list of all that was done:Machined Trigger frame for adapter plateHomemade Adapter plate for 1928 ButtRelief in frame for takedown button to slide in easierRemoved 1/4" of Receiver Rails for Tool-less TakedownEZ-Pull Spring SetPolished Bolt, Bolt Run, Firing Pin and Feed RampHand Filed the Charging Handle Knurling DeeperMilled Frame for 1928 GripAdded 1928 style "Grip Blade to Frame"Milled Foregrip Mount to be able to Remove before BarrelDrilled and Tapped Set Screw Into Foregrip MountAdded Green Mt. 14.125" Finned Barrel.Full on Re-Blue of all Parts New and oldWhite Lettering Original "Thompson" Parts Added:Cutts CompLyman Sight"S" Ejector "S" Extractor"S" Foregrip"S" Non Crossbolt Butt"M" Rear Grip"S" Butt Slide Hardware"S" Sling SwivelsButt plateOilerKerr M1917 Sling So here's the start. 4 years ago as I bought it. An Auto Ordnance T1-C Commando or, in other words a, 1927A1 Parkerized with Black Wood.Me being the Carpenter I am I can't leave anything alone. I have to make everything MINE in some way or another. So about a year later I stripped the Walnut and inlayed an Aut-Ord-Co shaped Tiger Maple with a little airbrushed TOMMY logo.The inlay was on both sides of the ButtstockFor full disclosure this is Doug Richardson's original drawing (on the left) for his Buttstock adapter plate. And my modified version for what I did to my Thompson. (On the right) Red lines are the new profile and blue is the adaptor plate. I had seen other pictures, like these below, of the adapter plate and was not happy with the end result. Although it may be somebody else's "perfect" it wasn't mine. I decided to get all crazy and make my SA trigger frame resemble a FA frame as close as possible. I have to admit I am terrible at remembering to take pics during projects. I get too into what I'm doing at the time and get pissed every time I forget. So here's what I got. This is a shot of the receiver rails with the material removed for the tool-less takedown. The frame latch button now stops at the sear you pull the trigger and it's apart. Much better than sticking a flathead screwdriver into the back of the gun.Here is the relief I put into the frame for re-assembly. It just lets the latch button go into the channel a little easier. Just take a round file and a little patience.Next we move on to the foregrip mount. This is one of Reconbob's reproductions. VERY high quality. But after removing the original Kahr barrel I wanted to be able to have an easier time in the future if I ever have to remove this Green Mt. barrel. So I filed down the catch on top of the mount just far enough to clear the barrel fin so it can be removed before the barrel. Even though the pressure fit is very tight I wanted to make sure the mount would stay in the gun. The solution was to be a little un-original and drill and tap a set screw. The threads are actually in the mount and just under 1/8" of the screw protrudes into a thread-less hole in the receiver. Making the adapter plate was the easy part….. Using this pig to machine away all of the extra material off of the trigger frame was a true test of my patience and willingness to finish this remodel…It's a 3/4" Carbide burr. Or as I call it a poor man's machining bit. I used this and my other smaller burrs to do the machine work on the receiver and frame.Like I said I'm bad at remembering pics so we skip clear foreword to welding. The 3 spot welds in the adapter plate are 3/8" dia. Hard to see here but I also machined away the frame in the slot toward the safety closer to how a 1928 is. The left one shows the frame finished just enough to get the gun together for test fire The right one is after test and the modified areas of the frame are finaled out. And here is the final fit before I went out to test fire. I put 200 rounds through her. I did have a couple of issues with the extractor popping out but I was using the Kahr one. I figure I'll try the Savage one I have now and hopefully it'll do the trick. Notice the grip doesn't match the other two pieces. A combo of stains and true oil were used to match it to the others as you'll see in a min. This was the last bit of "machining" I had to do. Even though these SA's resemble the '28's I was going more for the finish of the Colt 21's. I love the belt-sanded and blued look of them. So I came up with my "Ghetto lathe" as my brother in law calls it….whatever gets it done right? These few are the final in-the-white shots before it went to Blue. I did the full wood assembly just to see it that way… Yes there are a lot of original parts getting refinished but I want my whole gun to "age" together so It'll always be right with itself. Just got the one shot of it here when I brought the parts home from their bath. About an hour later all the lettering was white. Here we have the end result. I have to say this was one of the most satisfying projects I have ever undertaken. I'll just let the pictures talk from here. Jon And Just Because......... Edited May 8, 2015 by 06AngusSG 1 Link to comment Share on other sites More sharing options...
Gio Posted May 8, 2015 Report Share Posted May 8, 2015 06AngusSG, Nice looking 27 you did a lot of good work. Please tell my why you didn't use a 28 lower. If you used the 28 lower wouldn't had to use dougs plate and would eliminate using a third hand. The mane thing it would look like a 28. Still a good looking gun. Frank Link to comment Share on other sites More sharing options...
06AngusSG Posted May 8, 2015 Author Report Share Posted May 8, 2015 06AngusSG, Nice looking 27 you did a lot of good work. Please tell my why you didn't use a 28 lower. If you used the 28 lower wouldn't had to use dougs plate and would eliminate using a third hand. The mane thing it would look like a 28. Still a good looking gun. FrankThanks Frank. I didn't learn about the '28 lower thing until I was already started. I don't have any drum mags so the third hand thing isn't an issue. If it becomes one I will probably just drill my frame to accept the selector. That way there is less modding to be done the the trigger group. Another future project perhaps...??? To be clear, I didn't use one of Doug's plates. I had to make my own since I carried it so far into the frame. Jon Link to comment Share on other sites More sharing options...
anticus Posted May 8, 2015 Report Share Posted May 8, 2015 Wonderful job ! The finish is gorgeous. Link to comment Share on other sites More sharing options...
Gio Posted May 8, 2015 Report Share Posted May 8, 2015 06AngusSG Your plate looks a lot better than Doug's. With Doug's plate the transition between the stock and trigger grip on lower looks bad. Yours looks as if were made that way. Frank Link to comment Share on other sites More sharing options...
emmagee1917 Posted May 8, 2015 Report Share Posted May 8, 2015 In my best George Peppard voice ;" I love it when a plan comes together . " I did not know you were using a long handguard , glad you used a '17 , a M3 would have been too short , I fear .I bet it was a task to get the sling ring through the handguard swivel . Usually the clip pivots through , comes back through the ring , then back to the swivel to snap .You then pull rearward on the inside loop to tighten up . A couple of quick pulls forward on the outside loop loosens the sling , allowing you to detach the rear clip and pull on the sling. This will cause the rear clip to slide through the rear sling swivel and lock . Very fast to deploy .Very nice work and gun.Chris Link to comment Share on other sites More sharing options...
shadycon Posted May 9, 2015 Report Share Posted May 9, 2015 Very nice!!!!!!!!!!!!!!!!!!! Link to comment Share on other sites More sharing options...
06AngusSG Posted May 12, 2015 Author Report Share Posted May 12, 2015 (edited) Chris,Thanks for the sling and the kind words. The "plan did come together" perfectly!I can actually get the sling ring through the forefront ring pretty effortlessly....Jon Edited June 3, 2015 by 06AngusSG Link to comment Share on other sites More sharing options...
Motorcar Posted May 12, 2015 Report Share Posted May 12, 2015 Beautiful transformation. Not everyone has the skill or patience to do what you did, congrats! Link to comment Share on other sites More sharing options...
Kocapuff1 Posted May 12, 2015 Report Share Posted May 12, 2015 Jon, Great Job! Congratulations! Wonderful work and I can see all the time you put into it. The attention to detail really paid off! I like the white lettering on the mags; I'm glad they work great for you! Be proud. Regards,Keith Link to comment Share on other sites More sharing options...
Bobbyb Posted June 2, 2015 Report Share Posted June 2, 2015 I've been thinking about getting the green mtn. barrel for my AO commando, but would like to use my original AO horiz. forearm. Exactly why does it look bad? I would have to buy an original ww2 horiz forearm? Thanks. Link to comment Share on other sites More sharing options...
06AngusSG Posted June 3, 2015 Author Report Share Posted June 3, 2015 (edited) I've been thinking about getting the green mtn. barrel for my AO commando, but would like to use my original AO horiz. forearm. Exactly why does it look bad? I would have to buy an original ww2 horiz forearm? Thanks. As seen in the pics below, there is a large horrible looking gap between the barrel and the grip when you have a Gr. Mt. Barrel with an AO grip. The other pic is the WWII original with the GMB. GMB makes their barrels to the original spec as far as diameter and fin size/spacing whereas AO does not. AO has to many fins and they are bigger. I think to try to optically reduce the bad look of the 16" barrel...Anyway, see below and you be the judge. If you go with a WWII foregrip you will also have to either widen the groove in the wood to 3/4" or buy an original or repro 1/2" grip mount. Reconbob (Phila Ordnance) makes an excellent repro. It is what I used on mine. Jon Edited June 3, 2015 by 06AngusSG Link to comment Share on other sites More sharing options...
Bobbyb Posted June 4, 2015 Report Share Posted June 4, 2015 Thanks Jon, I can see the WW2 grip looks alot better. More decisions for me . Great job! Bob Link to comment Share on other sites More sharing options...
06AngusSG Posted June 5, 2015 Author Report Share Posted June 5, 2015 (edited) Thanks Jon, I can see the WW2 grip looks alot better. More decisions for me . Great job! BobThank you Bob. See how it can spiral into a big project? I started out just the same.... Shorten the barrel... then one thing leads to the next and BAM!! You've redone the whole thing.Well worth it though. It was one of the most gratifying things I've ever undertaken.Good luck on yours. Post some pics when you're done. Jon Edited November 3, 2015 by 06AngusSG Link to comment Share on other sites More sharing options...
beginner2 Posted February 2, 2016 Report Share Posted February 2, 2016 What type of welder did you use TIG,MIG,STICK? Link to comment Share on other sites More sharing options...
06AngusSG Posted February 2, 2016 Author Report Share Posted February 2, 2016 I used a MIG welder. Welded high and ground to desired size. Link to comment Share on other sites More sharing options...
beginner2 Posted February 3, 2016 Report Share Posted February 3, 2016 You did a great jobBill Link to comment Share on other sites More sharing options...

Recommended Posts
Create an account or sign in to comment
You need to be a member in order to leave a comment
Create an account
Sign up for a new account in our community. It's easy!
Register a new accountSign in
Already have an account? Sign in here.
Sign In Now